
.jpg)
How to Create Billing Software for Auto Data Entry in Excel?

Excel is an excellent tool for startups and SMEs that find it hard to afford SAP or a similar application or software. It allows you to create billing software in Excel, at least. An MIS or programmer has a tonne of opportunities to make it happen through code and scripting. They can develop small back-office management tools to automate workflow.
- Using an Excel Template on Windows as an invoice template
- Creating Customized Billing Software from Scratch
- Leveraging Agentic AI
Let’s get started with tips that a data entry organization uses to create it on Windows via ready-made templates and customized functions.
Step-by-Step: Create an Invoice from an Excel Template on Windows
Excel offers customizable templates to bill its customers. Data entry organizations or even you may create an invoice from an Excel template, which is available on a Windows PC. These steps can help you make it easier:
Step 1: Launch Microsoft Excel and Access Templates
It’s compulsory to have an Excel template on your system to launch the billing software in Excel. So, launch Microsoft Excel on your PC.
Step 2: Explore and Choose Built‑In Invoice Templates
Upon launching, open it up on your system. For the purpose of finding, go to the search bar at the top of the window.
Set up an online connection and type “invoice” to find such predefined templates in no time.
Step 3: Select the Best‑Fit Template for Your Billing Needs
There will be a range of invoice templates, scaling from sales to shipping bills. Scroll down unless you pick up the one that is the perfect fit for your bill layout. Make it yours by adding your company’s logo.
Step 4: Create and Open the Selected Invoice Template
The preset template is there for you to select and then click the best-fit layout. It will show you the preview, and then click the “Create” button to actually open it in a new tab.
Step 5: Customize the Template with Your Company Details
Now, the need is to modify it. Adjust it to appear more like your own company’s billing template. For this purpose, edit it, first. Ensure to include the following points to make billing software in Excel:
- Your company’s logo
- Your company or office contact information, including your name, address, phone number, and email
- Your customer’s contact details
- The billing date
- A unique bill (invoice) number
- Due date of payment
- A checklist of items or services with proper quantity, working hours on descriptions, quality testing, and rates.
- Total each service or product separately
- Also include the payment conditions, covering payment methods and late fee details
- The total amount due for the bill, including all taxes
These details will guide you to make billing software in Excel automatically.
Step 6: Save and Export Your Customized Billing Layout
Once you have added all the necessary information to your bill, save the edited template to your computer. It is saved with the …abc.xls format document. Doing this thing will make this template editable, shareable, and usable. Ensure to save it as a PDF and send this soft copy to your client. It promotes painless and paperless transactions, which cannot be altered later to be machine-run.
Step 7: Share and Send the Invoice to Customers
Now, you have your bill template. Send it to your customer, either in the inbox or by mail. Enclosing it with a short PDF or video of your corporate film can also prove to be an impact-making experience. Your advancement in digitization would take an upswing this way.
Do add the important details like the bill due date and the total debt.
How to Create an Invoice in Excel from Scratch (DIY Method)
Here, you may figure out how to create a billing system in Excel from scratch. You may follow these easy steps:
Step 1: Click and Open a Blank Excel Workbook
Launch MS Excel on your system if it’s not there inside. Then, click it open to work on the blank workbook.
Step 2: Add a Header and Business Details
A header will be a label or name of your bills, such as Sales Invoice, Purchase Bill, Transaction Bill, and many other ones.
Add a title at the top of your invoice. As in the preset template, mention important billing details in the title, which cover:
- Your logo
- Your business contact information
- The invoice date
- A unique bill or invoice number
- Include the Customer Details
Herein, you must enter the contact details, which cover the exact contact person, office location or address, email ID, contact number, etc.
Step 3: Clearly Highlight the Payment Due Date
Highlighting the payment due date on the bill will keep your customer alert about when to pay. So, do add a neat and complete date format with it.
It should read like “Payment Due December 31, 2022.” Avoid using other formats like “Payment Due in 30 Days.” This mention can confuse you and the customer, and the payment may be missed.
Step 4: List All Products or Services with Quantity and Rates
Here, you can put the products in a sequence with quantity. Segment them under different titles, such as Products, Quantity or Description, Working Hours, and corresponding prices.
In the end, label a column with a subtotal against each product listed.
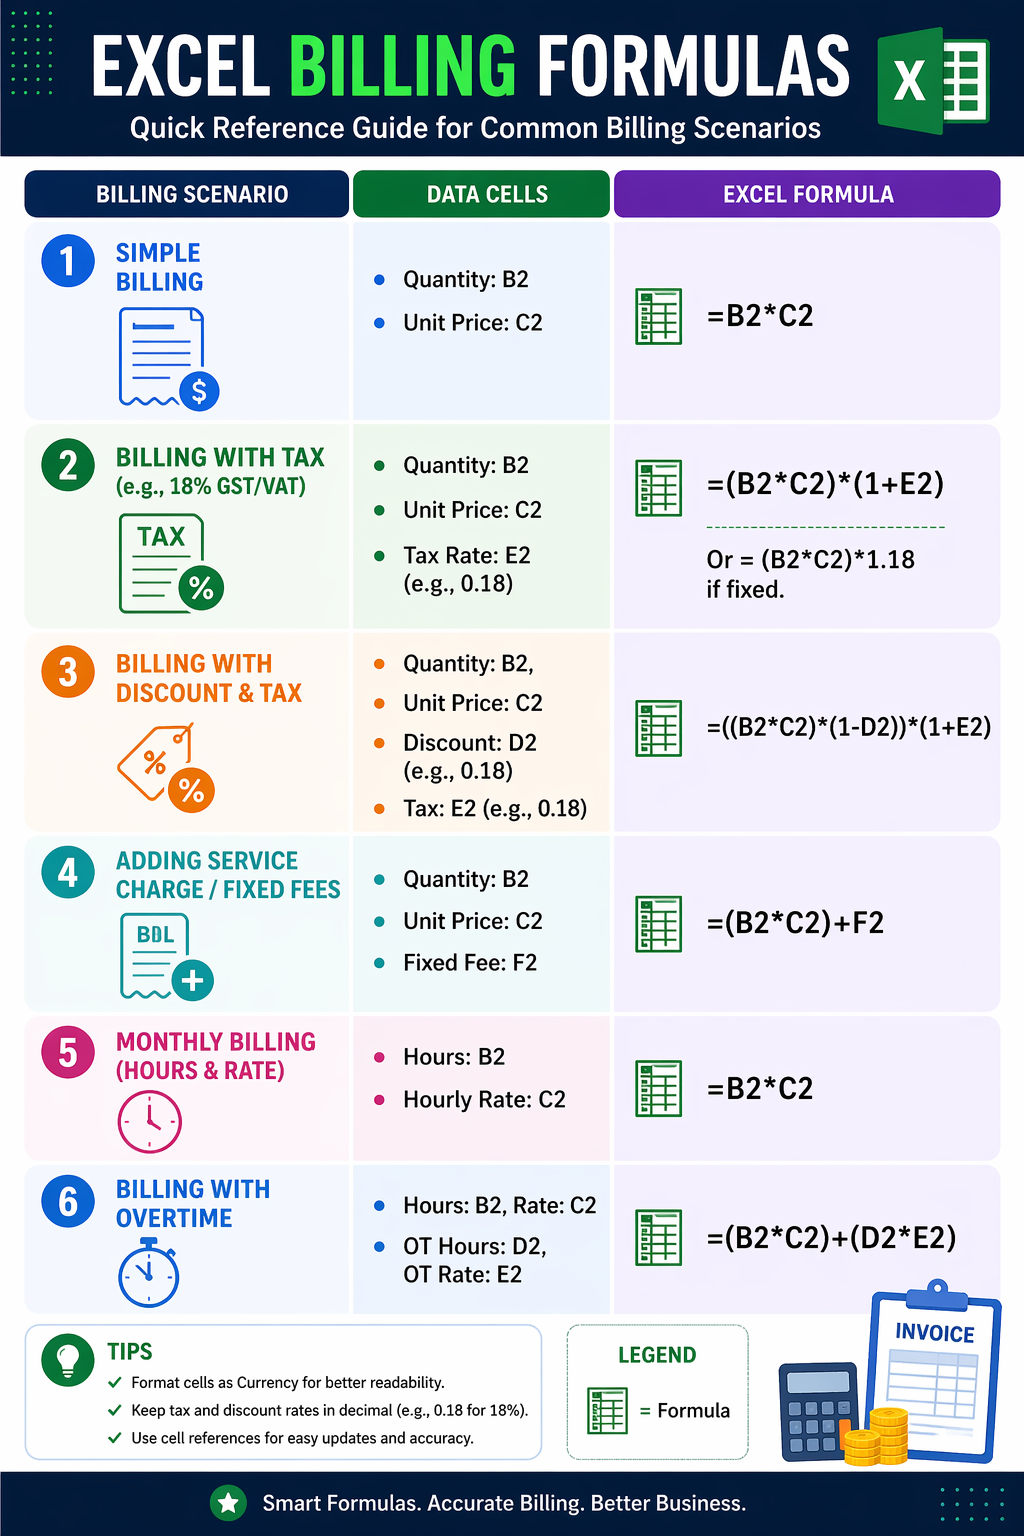
Step 5: Use Excel Billing Formulas to Calculate Totals
Now, you can use billing formulas in Excel accordingly. Excel comes with advanced features and functions that can do calculations for you.
For Sum, use this syntax: =sum (Range 1: Range 2) and then press enter.
Likewise, you may multiply values using the syntax: = A1*B1. The outcome will automatically appear as you press the enter key.
Commonly Used Billing Formulas in Excel (With Tax, Discount & Fees)
However, billing formulas in Excel are not rocket science but math. Here are some common calculations used for billing in Excel. Excel uses ranges or cells that contain specific values in its formulas.
|
|
|
|
|
|
|
|
|
|
|
|
|
|
|
|
|
|
|
|
|
|
|
|
|
|
|
|
|
|
|
|
|
|
|
Step 6: Add Payment Terms and Conditions
Give space for payment terms and conditions at the bottom of the bill. It should have payment methods accepted and the provision of your late fee policy. Select any cell below the label 'Stationery'.
Overall, this comprehensive guide to creating billing software will win half the battle in Excel. For hassle-free and qualitative results, incorporating an Excel data entry specialist is a wise idea. It ensures time and cost-effectiveness.
Build smart Excel billing software with AI automation for faster invoicing, tax calculation, and payment management.
AI Tools for Auto-Generating a Billing Software
As agentic AI has evolved, multiple tools are available to create billing software in a few clicks. Many expert support companies, like Eminenture, are also accessible to consult and even help you decide which methods work the best for you.
|
|
|
|
|
|
|
|
|
|
|
|
|
|
|
|
|
|
|
|
|
|
|
|
Conclusion
Creating billing software in Excel is an automatic process, as it has templates that can be used as per your requirements; edit and use them. Consult with some leading data entry companies like Eminenture helps you to create it from scratch effortlessly using company name and customer details, formulae, and terms and conditions with all products’ descriptions in it. Also, it allows you to calculate amounts, discounts, and taxes using Excel formulas for billing. Likewise, many agentic AI software like Claude AI, Cursor, and Replit are available to automatically generate.
.jpg)


.jpg)

Post Comment
Your email address will not be published. Required fields are marked *